
In this activity we will create a rainbow, and then add it to an image. The activity uses Photoshop.
Step 1. Start with an image
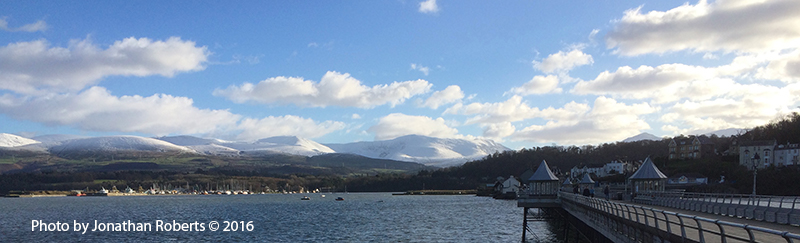
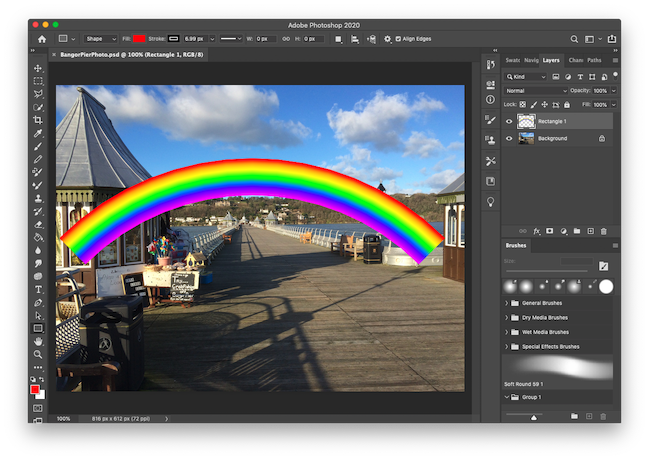
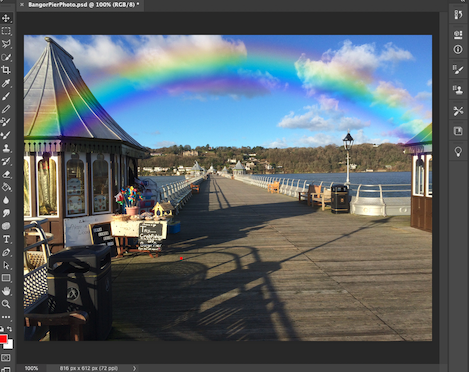
You need to choose your image. In these examples we will use a photograph of the pier at Bangor, in North Wales, UK. I took the photographs on the pier in January 2016; there was still Snow on the mountains.
Choose your image. An outside scene of some mountains may be good to choose. But whatever your chosen image, your first step is to start photoshop, and then load the image into Photoshop. Before you proceed, make sure you have Photoshop running and the image loaded. Goto File, and select Open, and navigate using the file browser to locate your chosen image file. Highlight a JPEG or a PNG image file, and select Open on the file browser.
Step 2. Create a rainbow-coloured rectangle
We will create the rainbow through a series of steps. To give you a heads-up the basic set of steps are to (1) start with a rectangle, (2) add rainbow colours, and (3) turn it into a set of pixels, (4) change the rectangle into an arc shape. Follow the steps below:
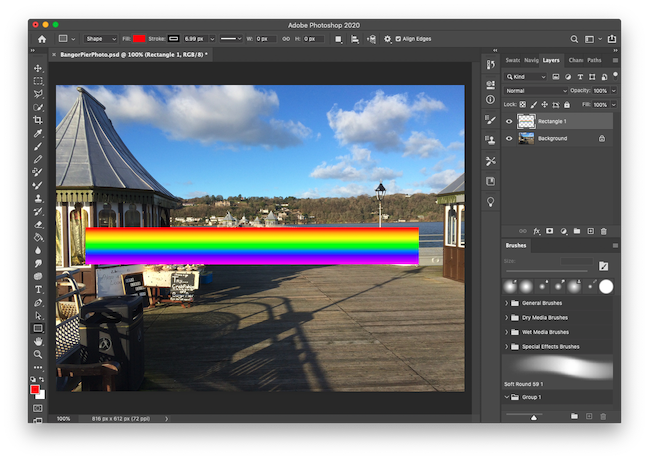
Create a long thin rectangle.

First locate and select the Rectangle Tool from the main Photoshop menu. Now create a long thin rectangle, that is about as long as the image is wide, and as wide as you want the rainbow to be.
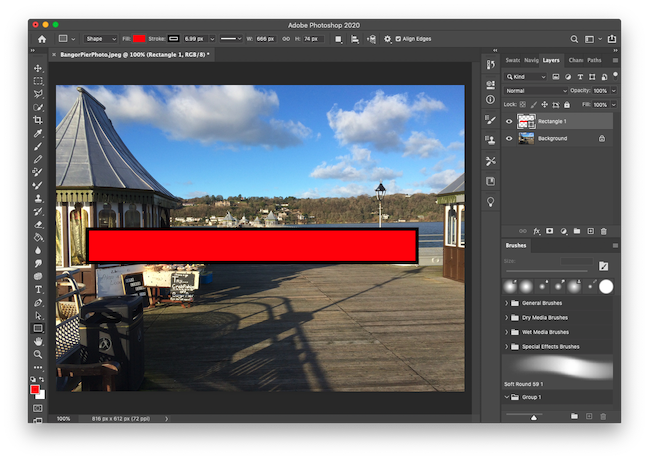
In my example, I had already used a red fill with a previous project, so when I created the rectangle it appeared in a similar setting: as a red rectangle with a dark border. But yours may look differently. But don’t worry, we will change the appearance of this rectangle.
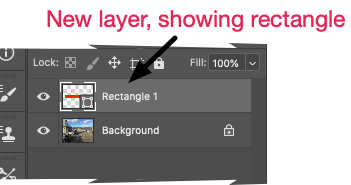
When the rectangle is created it is placed in a new Layer. The layer is probably named Rectangle 1. You can change the name to Rainbow, if you wish. Let’s call this the Rainbow layer.
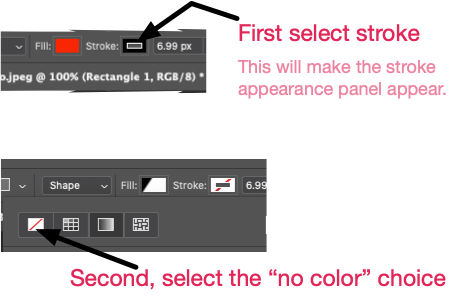
Remove the rectangle border (stroke)
Now we need to change the rectangle to make it look more like a rainbow! First make sure that the Rainbow layer is selected, and second make sure the Rectangle Tool is selected. When these two are selected a shape properties menu will appear.
It is possible to change many properties of the rectangle, but we are interested in three: the “Pick tool mode”, “set shape fill type” to change the colour of the rectangle, and “Set shape stroke type” to remove the stroke from the rectangle..
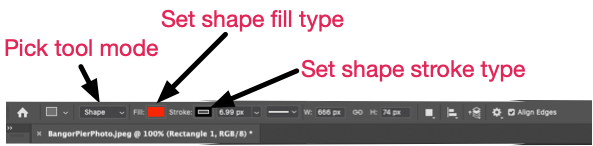
To remove the 'stroke' (border) from the rectangle, select the “no colour” option.
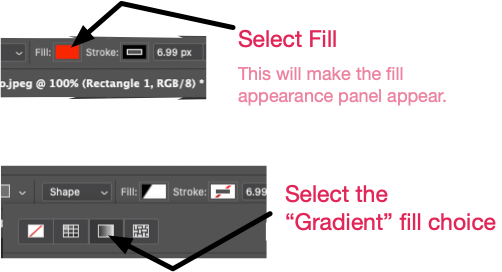
Change to gradient fill
Change the rectangle fill to Gradient fill. Like the previous step, first make sure that the Rainbow layer is selected, and second make sure the Rectangle Tool is selected. On the properties menu, choose the shape Fill, and select the Gradient option.
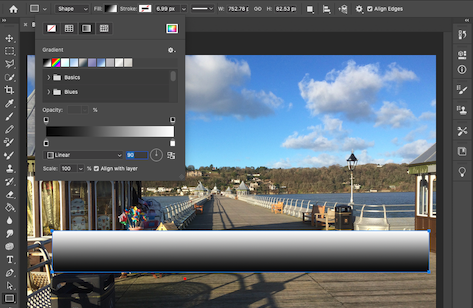
Add five stops to the Gradient panel
Again in the rectangle properties panel, we need to add five stops, to the two that are already there.
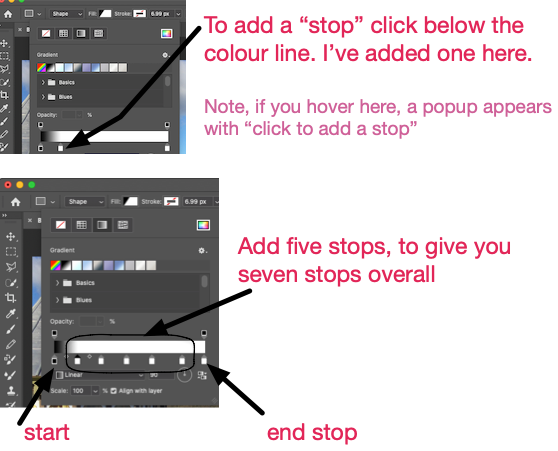
If you add too many stops, you can remove one by clicking the mouse on a stop (the white rectangle below the coloured rectangle area), holding it down while dragging it upwards.
Change the stop colours
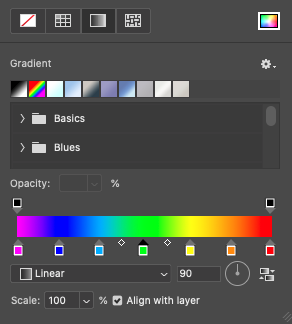
Now we need to change the colours of the “stops” to the colours of the rainbow. The easiest way is to add the colours in reverse order, such that the end colour is red, and the start colour is violet.
To change the colour of a “stop”, double click on the most right stop, the “end stop”. This will open up the Colour Picker for that colour stop. Choose a red colour for this stop. Now working backwards down the stops, change each stop to the colours of the rainbow.
Step 3. Rasterise and warp
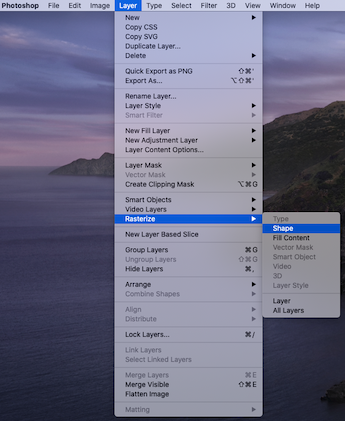
Now we need to change the rainbow layer from a rectangle into a set of pixels. To do this step, from the Photoshop menu, select Layer, choose Rasterize, and then Shape.
Now we need to warp the rectangle layer. We need to select the Warp menu. Make sure the rainbow layer is selected, select Edit>Transform>Warp. This will show the Warp menu.

On the Warp menu change the Warp pull-down menu to “Arc”. It probably initially says “Custom”. Select the pull-down menu, and choose “Arc”. This will have a direct affect to the displayed rectangle shape, altering it into an arc shape. It already looks more like a rainbow!
You can change the value of the warp, by moving the mouse to the white square (which appears at the top of the rainbow shape). Click on the white square and drag it up or down to change the angle of the arc. Adapt the arc until you are happy that it is a good rainbow shape.
Step 4. Improve the rainbow
The rainbow that we have created looks a little too perfect. We need to make it more translucent and blend better with the rest of the image.
Blurring the rainbow
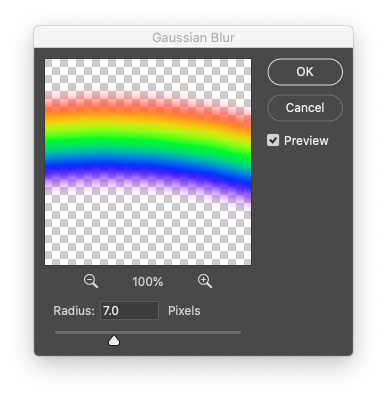
First let us smooth the rainbow using a Gaussian blur. To do this, make sure the Rainbow Layer is selected. Then from the menu select the main Filter menu, and then the Blur option, and finally choose Gaussian Blur. From this action a small window appears, where you can change the Radius value and see the results. You may need to drag the rainbow up or down (in the small preview view) to see it in the preview window. Try out different values. The lower the number, the less blur. I liked a value of 7, but you may like something higher (such as 10).
Make the rainbow more transparent.
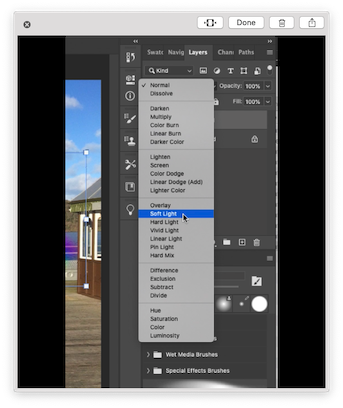
Now we need to make the rainbow more transparent. Select the Rainbow layer, and choose how it is being added to the rest of the image. Select the blending mode drop-down menu item. It is placed on the right hand side above the layers. It will probably be saying “Normal”, change this to “Soft Light“.
In addition you may like to reduce the Didreiddedd of the rainbow to about 50%. It depends on the value that you set for the Gaussian blur. Change this value at the Opacity option, that can be found just above the Layers. If you had a higher value of the Gaussian blur (such as 10) then you probably don’t need to change the Opacity value. With a lower value of the Gaussian blur (such as 7) then you may need to lower the Opacity value (to, for instance, 70%). Try out the values, until you are happy with the results.
Step 5. Move the rainbow and edit its edges
Now you have basically completed your rainbow, it just needs some finishing touches. First, move the rainbow into the location that you want it. I have moved it to a slightly higher position.
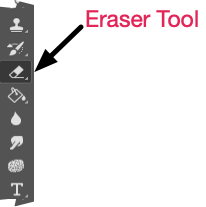
Second, delete some of the edges of the rainbow, such that it merges better with the underlying image. Use the Eraser tool. Choose a largish eraser, and remove the edges of the rainbow that overlap any objects. I have removed some of the rainbow over both the left and right kiosks.

Now you are complete. Go and save the image and share it with your friends!
Step 6. Other things to try out
There are many other edits you could try, here are a few ideas.
- Make a darker rainbow or a lighter rainbow. Try the rainbow with different filter options.
- Add a double rainbow onto the scene. Remember, with double rainbows the colours of the 2nd rainbow is reversed.
- Make a rainbow from earthy colours, such as browns and oranges.
- Add a reflection of the light into windows, water, or other parts of the scene.