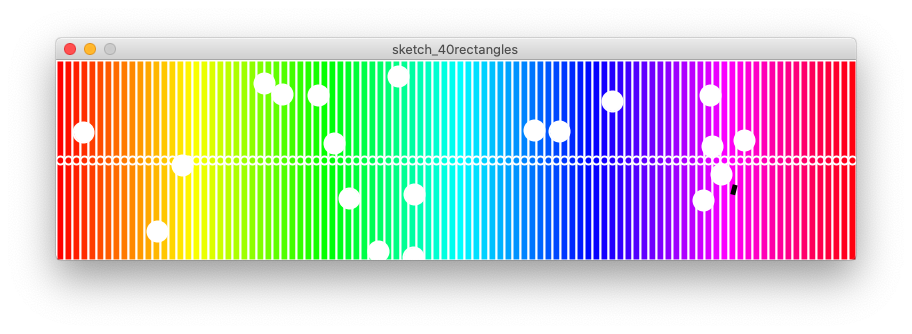
In this activity we will plot a known quantity of coloured rectangles and circles. For example, let’s choose 40 rectangles and 40 circles. The objects will fit inside the width of the window. While this exercise is quite simple, we will think through the for-loop steps, and do some code refactoring to improve the code.

The activity uses the Processing library, and the Hue Saturation Brightness (HSB) colour model that was covered in a previous activity. Take a look at some earlier activities, before tackling this activity, especially if you have not done any already:
- setting up the programming environment,
- the activity to make a quick sketch before you code, and
- Hue Saturation Brightness activities first.
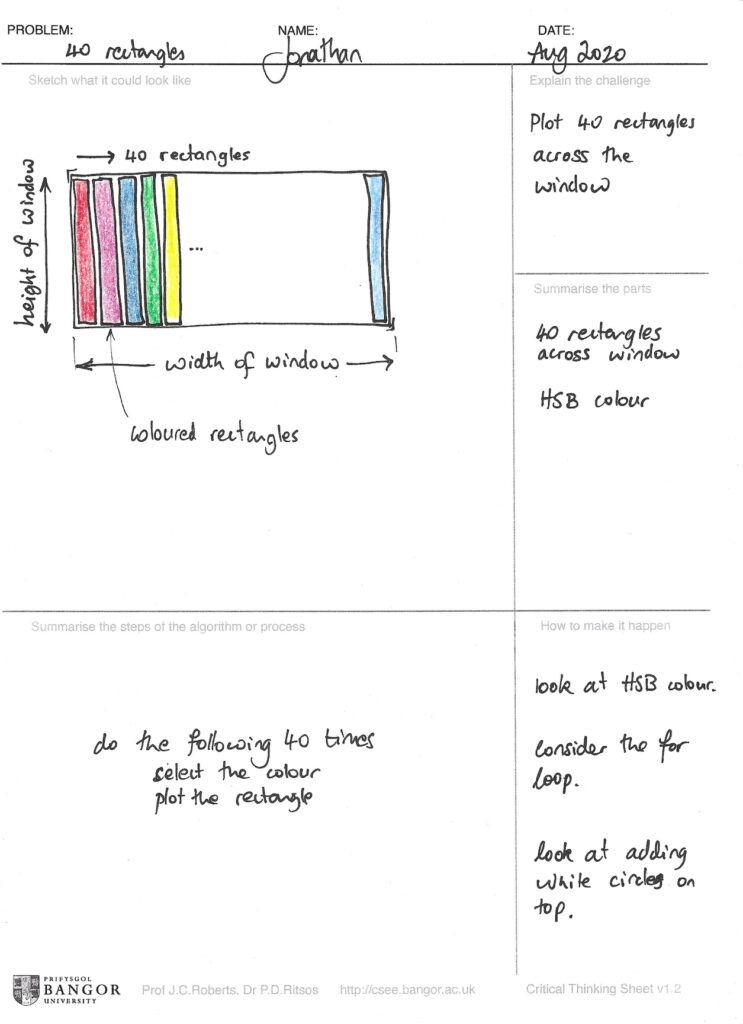
Step 1. Make a quick sketch
Before you start this activity, print out the critical-thinking sheet, and get a black pen and some coloured pens or pencils.
We first need to make sure that we know the vision for the activity, so that know where we are heading!
The goal of this activity is to plot a known quantity of coloured rectangles, that get placed across the page.
Now we can complete the five panels of the critical-thinking sheet. Complete them in order, 1 to 5, as follows:
- Write the problem, name and add today’s date. Also explain the challenge in panel ①
- In panel ② make a sketch that explains the idea, and annotate to make the sketch clear.
- Identify the main components of the problem in panel ③ .
- Explain the steps of the algorithm in panel ④. We can use a for-loop to plot 40 rectangles, and use multiplication to calculate the exact position.
- In the final panel think what to do next. Maybe consider how the rectangles can be coloured, and perhaps consider placing white circles on top to add some extra interest.
Step 2. Set up the Processing environment
Setting up the Processing environment with a draft project should easy now. Create a grey rectangle on a white background in a thin window, as follows:
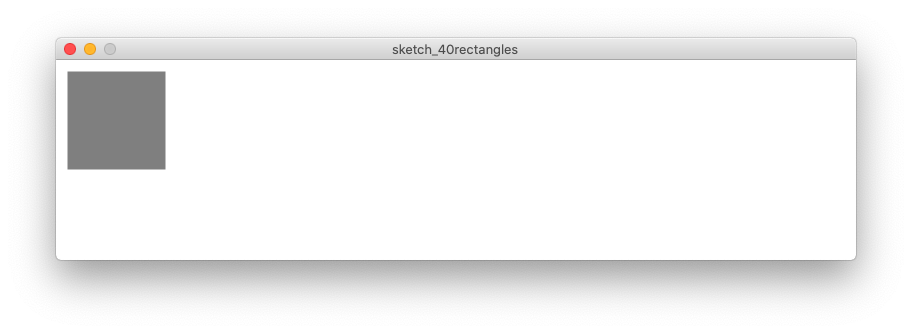
- Set the
sizeof the window. Make long thin window 800 by 200. - Choose the correct
colorMode(we said that we would use HSB). Let’s have these values range between 0 and 100. - Set the background to white. We need to use the correct values, as you have set by the
colorModefunction. - Place a test
rectdown to make sure things work. Make the rectangle grey, with a white stroke that is width 2.
size(800,200);
colourMode(HSB, 100, 100, 100);
background(100);

// Do a test with one rectangle
// just to make sure that everything is working fine
fill(50);
stroke(100);
strokeWeight(2);
rect(10,10,100,100);
Step 3. Make the for loop
To create 40 rectangles we will use a for loop. For loops are useful to create known quantities of things, in our case we have 40 rectangles.
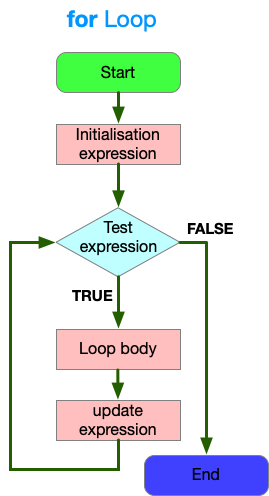
The for loop has three main parts:
- An initialisation expression that occurs at the start of the loop and only happens once.
- The test expression happens at the beginning of every loop. If the expression is True then the loop continues. If it is False it Ends.
- The update expression happens at the end of each loop, after the loop body, and just before the next test expression is called. Each of these parts are separated by semicolons.
for ( A ; B ; C ) { ... loop body ... }
Top tip.
With zero-based indexing systems. The first one is at position 0, and the tenth element is at position 9. With n objects the last one sits at n-1.
We need a loop counter, as a way to keep a tally of how many times we go around the loop. The loop counter is also used to test to see if we need to loop again. For loops and loop counters are very powerful and can be defined many ways, but there are a few conventions that programmers use:
- Typically loop counters are variables that have a short name. Programmers often use i, and j, k as needed.
- Loop counters (typically) start from zero. While this may sound unusual, it fits in better with other programming concepts, such as
arraysthat also start from zero in many languages. - Count in ones and use an integer loop counter. While, it is possible to have non-integer for-loop counters, try to avoid it. If you think you need floating point variables, don’t do it, there is a better way to do what you want to do!
- Keep the loop expressions separate from loop body commands. Especially as a learner, this is a good principle to follow. If you want 40 things, control it in the loop expression. What you do with these 40 things should be defined in the loop body.
We can now think through each of the parts of the for loop to create 40 things.
- The initialisation expression will be an integer, starting at 0. Let’s set it to be
int i=0; - The test expression, allows needs to check if the value
iis less than 40. We sayi < 40; - Finally, for the update expression we need to increment the loop counter by 1. We can say
i = i+1;or as a shorthandi++.
for( int i=0; i<40; i++){
// the loop body goes here
}
Top tip.
When creating a for loop in the future, think about each expression in turn:
what to initialise,
what to test,
what to update.
Step 4. Now define the body of the for loop
Our current for loop makes 40 things. We now need to define the body statement.
To create the code body, we can break down the problem into steps. This will help us work out what doesn’t change (the constants) and what needs to be adapted by the loop counter (the variables).
First let us define one rectangle; plotted at an unknown (x,y) position with a width 20 and height to equal the height of the window. We can do this by writing:
rect( x, y, 20, height);We now need to define x, y and height. Well, in Processing, height is a pre-defined variable that holds the height of the window. So we now need to work out x and y. Because we said that every rectangle sits along the top, we can fix y to 0. Now we can simplify the line to:
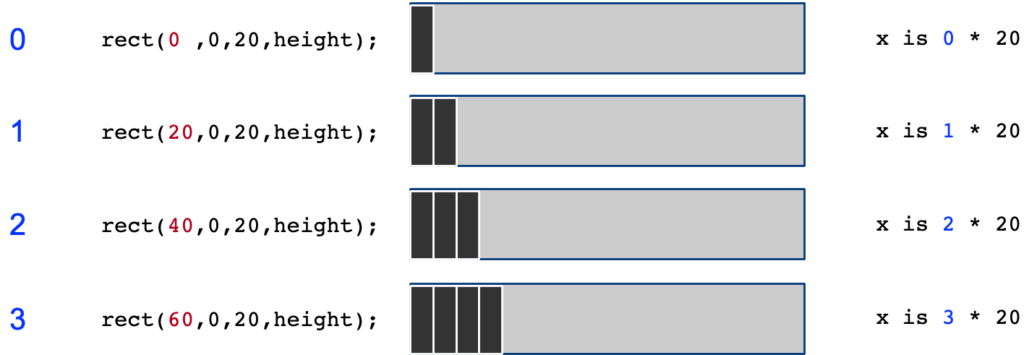
rect( x, 0, 20, height);Finally, we just need to work out the value for x. The x value changes every time, we can think through some steps::
- On the first time round, the loop counter
iis0, and we want to place the rectangle at (0,0). Soxis0. - The second time round
iis1, and we want to place the rectangle at (20,0), so x is 20. - The third time round,
iis set to2, and we want to place a rectangle at (40,0), and so x is 40, and so on for the other values.
It is clear to see that x = i * 20. Where every rectangle is placed 20 points to the right of the previous. Because the width of each rectangle is also 20, it means that one rectangle starts as the previous ends.
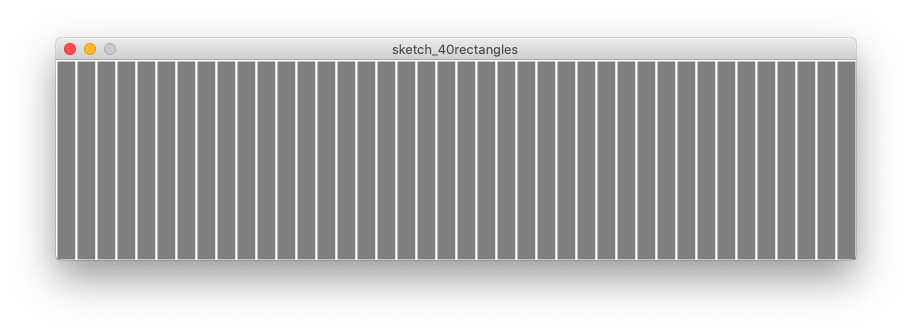
The code so far is as follows:
size(800,200);
colorMode(HSB,100,100,100);
background(100);

fill(50); // set the colour to grey
stroke(100);
strokeWeight(2);

for( int i=0; i<40; i++){
  rect(i*20,0,20,height);
}
Step 5. Change the colour of each rectangle
It’s fun to try out different colour combinations. Let’s do a few:
Select random colours. To set each colour with a random value, we first choose a random value, and set the hue to this value.
- We need to set the
fillcolour before creating a rectangle, so it will set the rectangle with the desired colour. - Because, with
colorModewe set the range of hue to be 100, we need a random value between 0 and 100.
fill(random(100),100,100);
rect(i*20,0,20,height);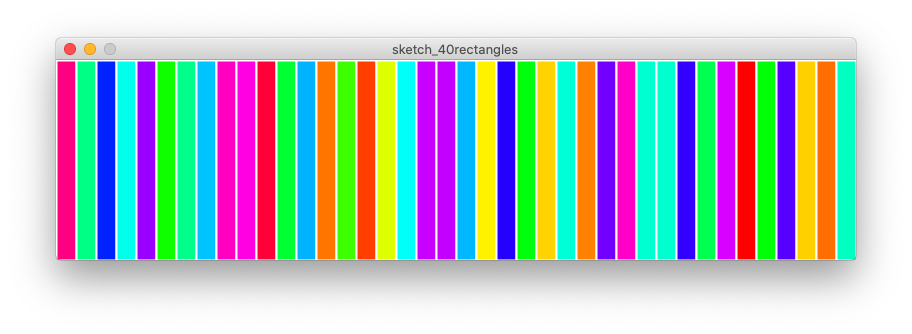
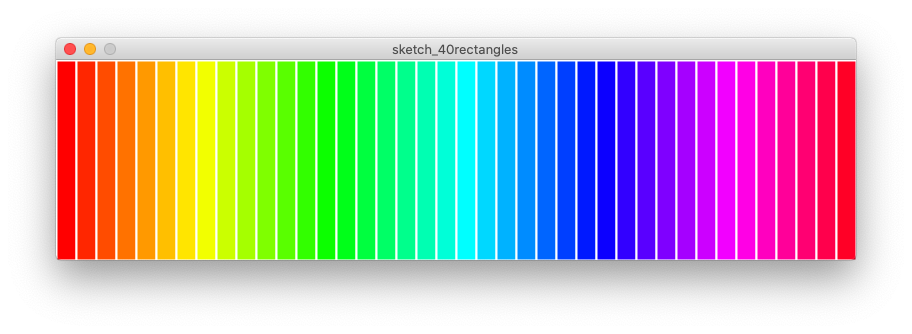
Spectrum coloured rectangles. To set each of the colours to a different hue, we need to map the loop counter value to the hue. The easiest way to do this is to set both ranges to the same values: the range of the colour hue, to the range of the rectangle quantity.
To do this action, we could change the for loop value to fit in with the hue; or change the range of the colorMode to fit in with the quantity of rectangles. It is easier to adapt the colorMode to the rectangle quantity.
size(800,200);
colorMode(HSB,40,100,100);
background(40);

stroke(40);
strokeWeight(2);

for( int i=0; i<40; i++){
  fill(i,100,100);
  rect(i*20,0,20,height);
}
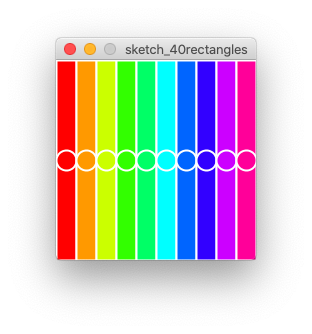
Add 40 circles. Now we can add additional circles to the picture. Every rectangle gets a circle in the centre. One way to do this is to copy the whole of the for loop, and replace the rect command with an ellipse and change some of the values that define the right sized ellipse.
size(800,200);
colorMode(HSB,40,100,100);
background(40);

stroke(40);
strokeWeight(2);

for( int i=0; i<40; i++){
  fill(i,100,100);
  rect(i*20, 0, 20, height);
}

for( int i=0; i<40; i++){
  fill(i,100,100);
  ellipse(i*20 + 10,100,20,20);
}Step 6. Refactor our code
Top tip.
Every time you write code; think how it can be refactored. Edit the code to make it more efficient, clearer to read, general, etc.
Now we have created the basic code – it is worth looking at the code – to see if we can improve it! This is the process of refactoring. Editing the code, and cleaning it up, without changing the functionality.
The idea is to look through the code, and see if we can edit it to improve it. Look for repetitions, fixed numbers that can be exchanged to constants or variables, and tidy up its presentation.
In our code, the first thing to notice, is that there are lots of numbers in the code.
These are “magic numbers“. They are magic because they do powerful things, but when you look back at your code you won’t remember what they do, or why you chose them.
In our code, we can notice a few of these “magic numbers”:
- The value 20 is duplicated many times. This number means two things: it is the width of the rectangle, and also the position of each rectangle. We need to make it clear that these are different things!
- Furthermore the value of 20 for the width of each rectangle was deliberately chosen. But this choice is very subtle, and someone who is reading the code may not understand why it was chosen. In fact, the value of 20 was chosen to fit well with the width of the window, which is set to 800 (20 * 40 gives us the width of the window). This value is very specific, and a variable may help to make the code more general.
- The number 40 is used both for the quantity of rectangles and the hue range.
Second, we have duplicated code. We don’t need two for-loops, we can do it all in one loop.
To improve the code, we can define a few variables.
- We need something to hold the position of each rectangle. Let us define an integer called
pos. - Let’s also define the width of each rectangle. Let’s have another integer, but call this one
wid. - We should also work out how many rectangles will fit in the window. We can do this by dividing
widinto thewidthof the window. But, this may not be an integer value, and we said that we’d want theforloops to only use integer loop counts. So, let’s take the lowest value of this division using the commandfloor(), which will round down the answer.
int pos = 20;
int wid = 20;
int quant = floor( width / wid );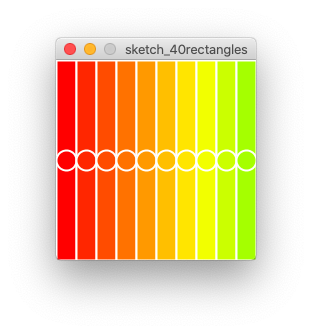
This gets us nearly there. But the colour definition is probably not what we want. Say if we want a smaller window, and set size(200,200). While the code works, and a small window is shown, the colour range is not quite what we wanted. We need to match the colour range to the quantity range. We can do this by adapting the colorMode line, and moving it lower. (Remembering also to change the background() and stroke() commands appropriately).
We could improve some of the other values, but our refactored code is as follows:
size(200,200);
background(255);

fill(50);
stroke(255);
strokeWeight(2);

int pos = 20;
int wid = 20;
int quant = floor( width / wid );
colorMode(HSB,quant,100,100);

for( int i=0; i<quant; i++){
  fill(i,100,100);
  rect(i*pos,0,wid,height);
  ellipse(i*pos + wid/2, 100, wid, wid);
}
Step 7. Your turn
Now you can try out different values and different settings.
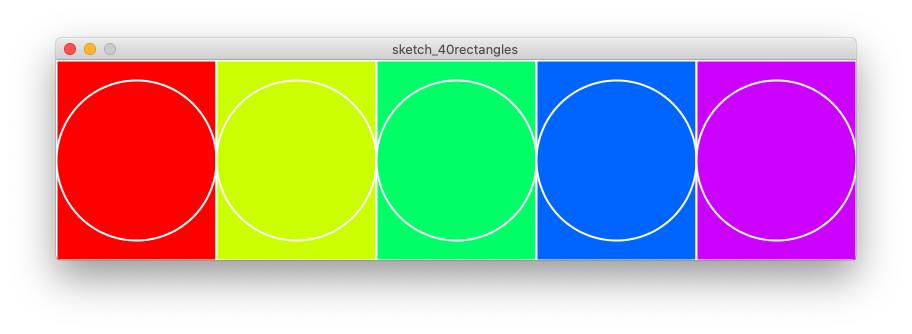
- Make a program with a fixed quantity of rectangles, and size the rectangle width appropriately. Adapt the code to make the width of each rectangle change, depending on how many rectangles you want to fit in the window. So, if you want 5 rectangles they are really wide. While 100 rectangles would be very thin.
- Add many circles to each of the rectangles.
- Change the stroke colours to black.
- Add twenty white circles, randomly placed on top of the design.